


herunterladen

Maxim > Design Support > Technical Documents > Application Notes > Communications Circuits > APP 4065
Maxim > Design Support > Technical Documents > Application Notes > Temperature Sensors and Thermal Management > APP 4065
Keywords: control loop, LDMOS, FET, bias, base station, power amplifier, RF
APPLICATION NOTE 4065
Implementing a MAX1385-Based Control Loop in
C/C++
Jun 21, 2007
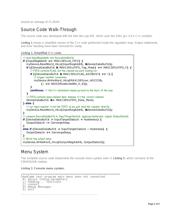
Abstract: Maxim's MAX1385 evaluation kit (EV kit) software includes a Windows® graphical user interface
(GUI) program; however, the time cost of updating this display interferes with the control loop. This application
note shows a more optimal control-loop program, using a console menu system instead of a GUI.
When used with the MAX1385EVKIT+ demo board, the control loop achieves a regulation accuracy of ±2%.
This accuracy is limited by the gate driver output step size and the FET transconductance. Drain-current
regulation step size is determined by the MAX1385's gate-voltage increment multiplied by the FET's effective
transconductance. Because the MAX1385EVKIT uses an IRFZ44N MOSFET to close the loop for
demonstration purposes, the regulation may not be the same as it would be when used with an LDMOS FET.
Required Hardware
Maxim MAX1385EVKIT+
Maxim CMAXQUSB+ (includes USB A-B cable)
Windows 2000/XP PC with USB port
5VDC at 100mA power supply
10VDC at 1000mA power supply
DMM for measuring drain current
DMM for measuring drain voltage
DMM for measuring PGAOUT amplified current-sense voltage
Optional: oscilloscope for monitoring GATE1 voltage and PGAOUT1 drain current
Setup
Download and unzip the necessary executable and source code files (ZIP, 736kB).
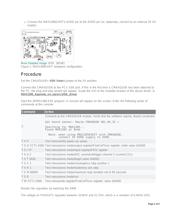
Assemble the hardware according to Figure 1.
Plug the CMAXQUSB header P3 into the MAX1385EVKIT connector J1.
Connect the MAX1385EVKIT's DRAIN1 and DRAIN2 pins to the current meter (-).
Connect the current meter (+) to the power supply (+).
Connect the MAX1385EVKIT's SOURCE1 and SOURCE2 pins to the power supply (-).
Connect the voltage meter (+) to the MAX1385EVKIT's DRAIN1 pin.
Connect the voltage meter (-) to the MAX1385EVKIT's SOURCE1 pin.
Page 1 of 6