

herunterladen
1. Installation
Do not connect the E1 debugger module until the software support has been installed.
1. Insert the CD into your computer’s CD-ROM drive. The CD should automatically run the installation program.
If the installer does not start, browse to the CD root folder and double click on ‘CsPlusLauncher.exe’.
2. Windows™ Vista/Windows™ 7 users may see “User Account Control” dialog box. If applicable, enter the
administrator password and click <OK>.
3. The pre installer will first check to see if the CubeSuite prerequisites are present, and will install if necessary
(this may take a few minutes).
4. Once the prerequisites are setup, the CubeSuite+ installer will launch.
5. The CubeSuite+ Welcome window will appear. Click <Next>.
6. The End User License Agreement appears. Read the license agreement and select <Accept> if you wish to
continue. Click <Next>.
7. The ‘Select Component’ window appears. Review the components by selecting each component in turn.
Click <Next> to continue.
8. The License Key Registration window appears. If you have a license key available, click the <License
Manager> button, otherwise go to Step 9. Enter the license key in the opened ‘License Manager’ dialog. Add
the license key. Click <Add>. If the license key is added successfully, click <Close>.
9. Click <Next>.
10. The ‘Installation Settings Confirmation’ window appears. Review the information and click <Next> to begin
installation.
11. The ‘Installation Execution’ window will appear showing the install status progress. Before completion, the
Renesas E-Series USB Driver installation dialog will appear. Windows™ Vista and Windows™ 7 users may
see a ‘Windows Security’ dialog box. Click ‘Always trust software from “Renesas Solutions Corp.”’ then click
<Install>.
12. After a successful installation click <Next>.
13. The ‘Setup Completion’ window will appear. Click <Finish> to close the installer.
2. Connection
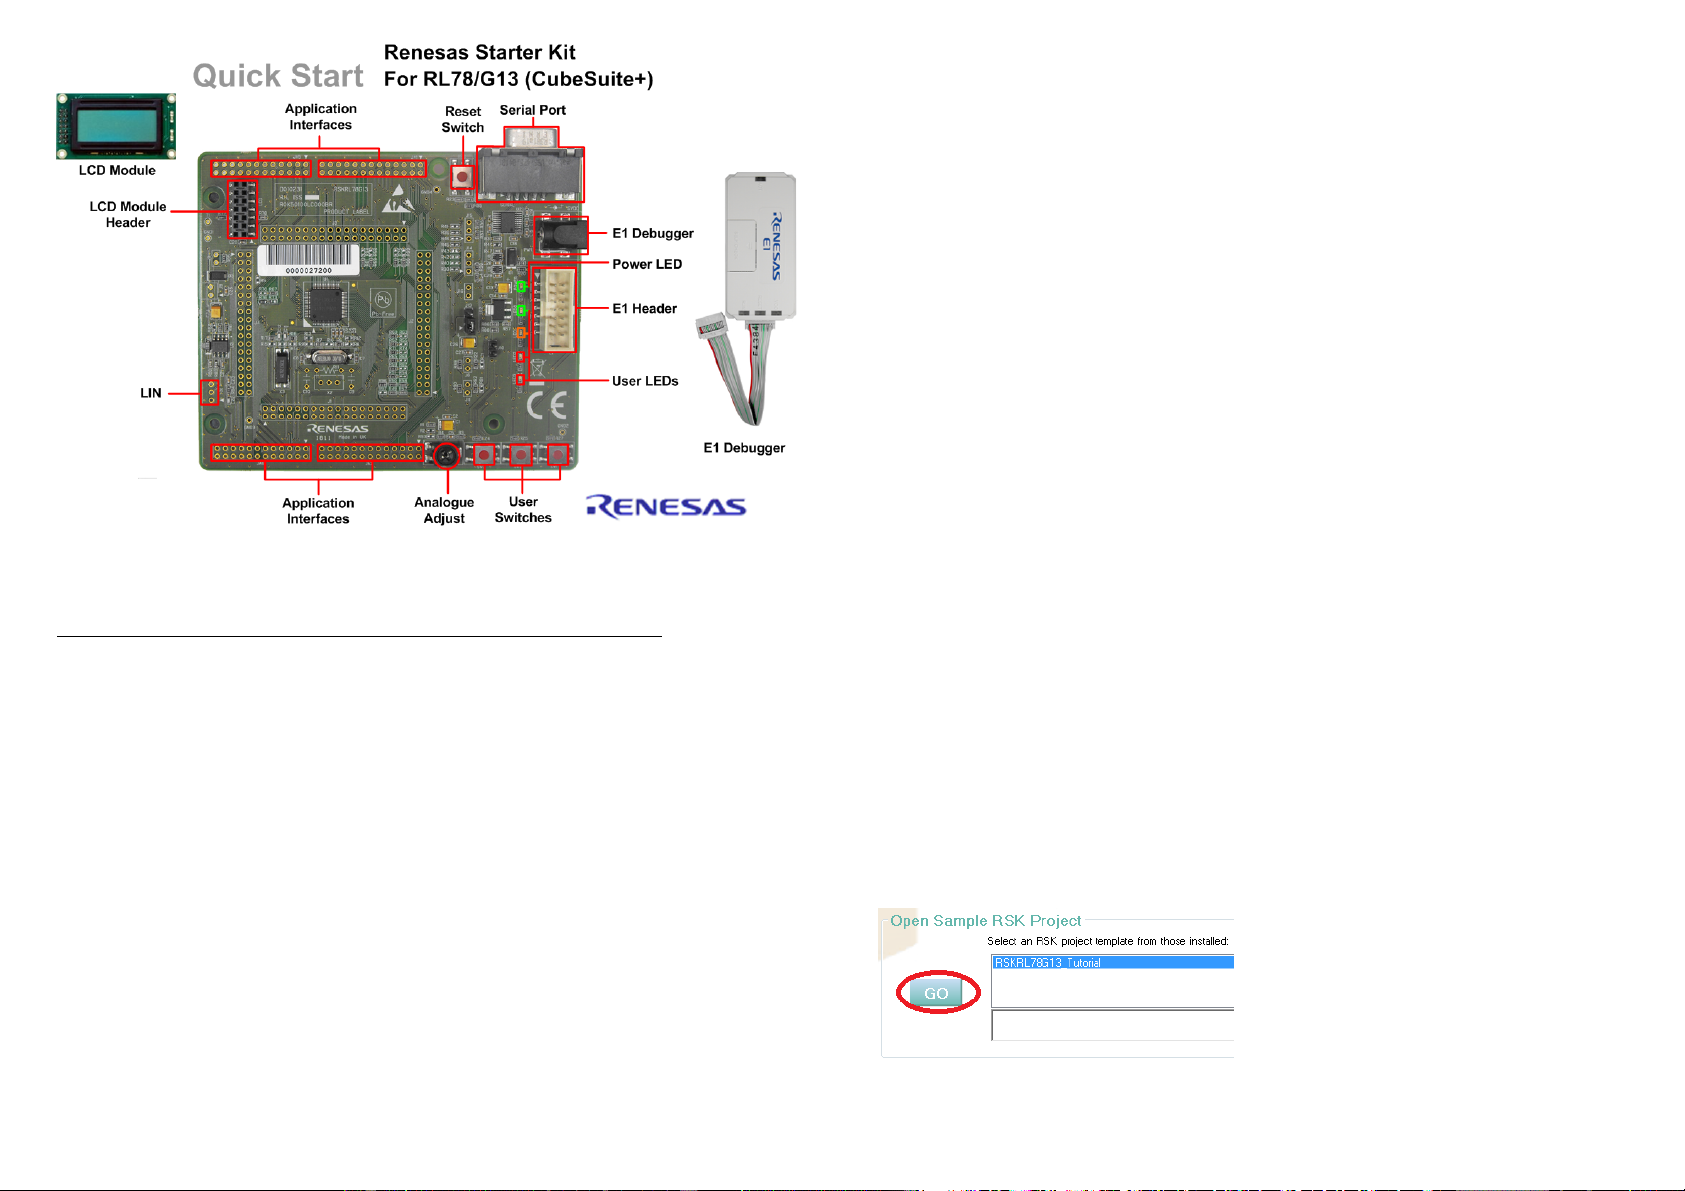
14. Fit the LCD module to the connector marked ‘LCD’ on the RSK. Ensure all the pins of the connector are
correctly inserted in the socket.
15. Connect the E1 debugger module to the connector marked ‘E1’ on the RSK using the ribbon cable.
16. Connect the E1 debugger module to a spare USB port of your PC. The green ‘ACT’ LED on the E1 debugger
will flash.
17. The ‘Found New Hardware’ Wizard will appear. Please follow the steps below to install the drivers. Note that,
administrator privileges are required for a Windows™ XP/Vista machine.
Windows™ XP
Windows™
V
ista
/ Windows™ 7
a. Select option ‘No, not this time’ in “Found New
Hardware” Wizard dialog, and click <Next>
button.
a. “Device driver software installed successfully”
pop-up will appear in the Windows toolbar and
installation will complete.
b. Verify the “Recommended” option is selected
and click <Next>.
c. If using Windows™
XP, go to step ‘e’;
otherwise, click <Next>.
d. Click <Next> to install the driver.
e. Click <Finish> to close the wizard.
Note: The Windows driver signing dialog may be displayed. Please accept the driver to continue.
18. The green ‘ACT’ LED on the E1 debugger will illuminate.
3. CubeSuite+ Project
CubeSuite+ integrates various tools such as compiler, assembler, debugger and editor into a common graphical
user interface. To learn more on how to use CubeSuite+, refer to the CubeSuite+ Tutorial manual from the menu
bar (Help > Tutorial).
19. Launch CubeSuite+ from the Windows Start Menu. (Start Menu > All Programs > Renesas Electronics
CubeSuite+ > CubeSuite+).
20. The ‘One Point Advice’ dialog which provides useful tips will open. The detail for this is out of scope for this
guide. Click <OK>.
21. The Start panel will appear. Select the RSKRL78G13_Tutorial project under the “Open Sample RSK Project”
and click <GO>.
22. In the “Create Project” dialog that follows, specify a name for the project. Leave the list of subprojects
unselected.
23. Click “Create” to launch the main Tutorial project.